Generate HTML Content via PowerApps and PowerAutomate and Host it on OneDrive
Scenario:
The client needs to easily generate certificates of completion for their employees. They have a canvas app with a gallery for viewing their employee list in SharePoint. They want a button next to each employee in the gallery that will generate a certificate with that employee’s information and save it to OneDrive.
Solution:
We will create a PowerAutomate flow that will receive HTML from the canvas app and write it to a file on OneDrive.
We will create a button in the canvas app that will insert the employee’s information into the HTML certificate and then submit it to the flow.
Things to Know:
- OneDrive is not a file server, so the browser will not properly render HTML (.html) files from OneDrive (opening a .html file from OneDrive will show a limited preview and give the option to download the file)
- Workaround: save the html content with an ASPX file extension (.aspx) (Active Server Page Extended file)
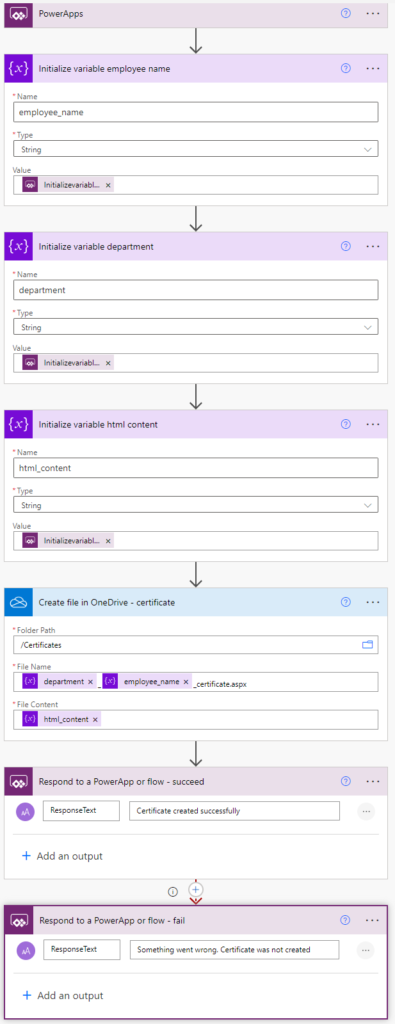
Let’s build the flow first:
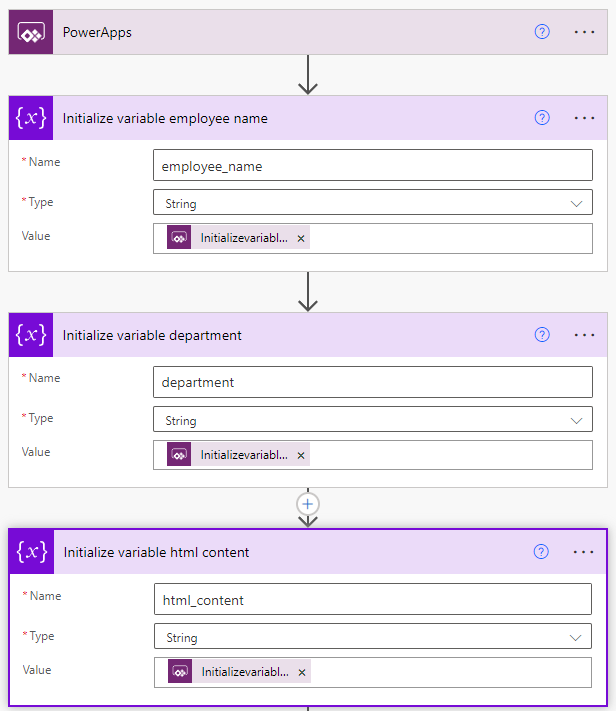
Create 3 variables with values set to “Ask in PowerApps”:
- employee_name – a string to hold the employee’s full name
- department – a string to hold the department name
- html_content – a string to hold the html content for the certificate
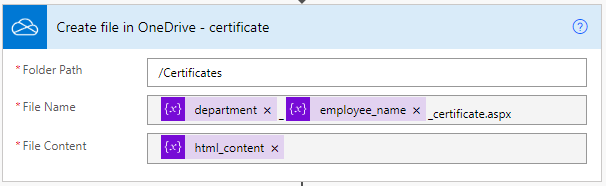
Create file in OneDrive
- Select the Folder Path where you want to save certificates
- Use the department and employee_name variables to dynamically create the File Name (modify to naming convention of your choice). ***IMPORTANT: the filename must end in .aspx
- Assign the html_content variable to the File Content
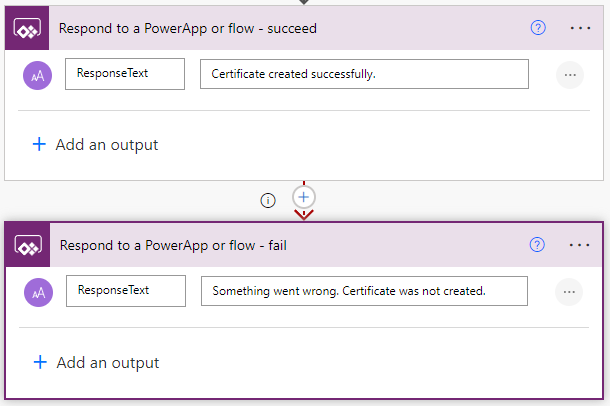
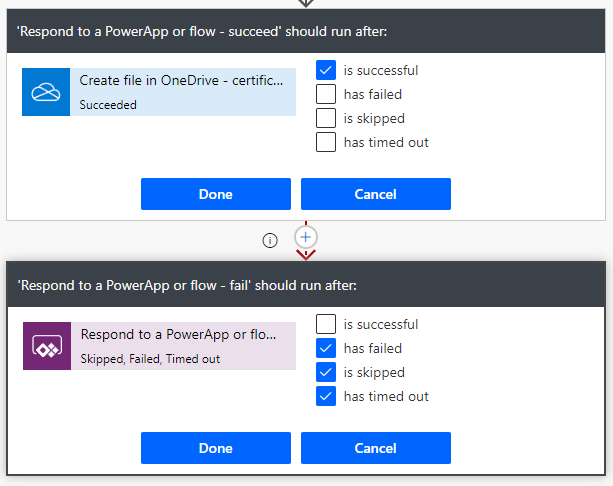
Respond to the PowerApp (succeed or fail)
- Create one Respond to PowerApp action to respond if the action is successful. Configure the run after properties to only run if the Create File in OneDrive action is successful
- Create a second Respond to PowerApp action to respond if the action fails. Configure the run after properties to only run if the previous “successful” Respond to PowerApp action has failed, is skipped, or has timed out.
Now let’s add a button in the canvas app:
Prepare a well-structured HTML template for the certificate
- For this example, I used a very simple template with a generic company name and logo
- To avoid any issues with users loading the logo image via URL, I chose to embed the base64-encoded image in the HTML.
- The logo we want for the certificate is the same as the one used in the PowerApp (the image control with the logo is named ‘Logo’ in this example).
- We can get the base64 encoding of the image using the JSON function (format must be set to IncludeBinaryData). and assign it to the variable logo_binary_data.
- Put the following in the OnVisible property of the screen.
*We use the Substitute function to remove the double quotes from the image data string.
UpdateContext(
    {
        logo_binary_data: Substitute(
            JSON(
                Logo.Image,
                JSONFormat.IncludeBinaryData
            ),
            """",
            ""
        )
    }
)
Next, add the Create Certificate button to the employee gallery
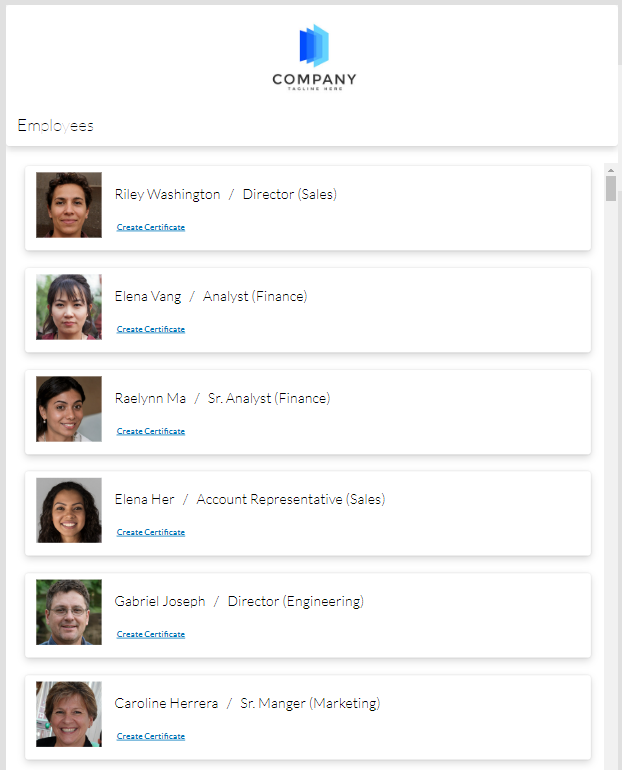
*The names and images above are A.I. generated. Any resemblance to actual persons is purely coincidental
In the Create Certificate button’s OnSelect property…
- First, we set the showFlowResponse variable to false to hide any already visible response dialogue.

- Next, we assign the HTML string to the context variable html_string. We insert the variable logo_binary_data (containing the base-64 logo image) and the specific employee information (ThisItem.Full_Name and ThisItem.Deparment). We also insert today’s date… Text(Today(),”mm/dd/yyyy“).
The OnSelect property should contain the following:
UpdateContext(
    {
        showFlowResponse: false,
        html_string: "
<html>
    <style type='text/css'>
            body, html {
                margin: 0;
                padding: 0;
            }

            body {
                color: black;
                display: table;
                font-family: Calibri, sans-serif;
                font-size: 22pt;
                text-align: center;
            }

            .container {
                border: 20px double gray;
                width: 11in;
                height: 7.5in;
                display: block;
                vertical-align: middle;
				padding-top:35px;
            }

            .marquee {
                color: blue;
                letter-spacing: 5px;
				height: 12%;
                font-size: 34pt;
                margin: 40px 20px 0;
            }

            .assignment {
                margin: 20px;
				color: darkgray;
            }

            .person {
                border-bottom: 2px solid black;
                font-size: 32px;
                font-style: italic;
                letter-spacing: 2px;
                margin: 20px auto;
                width: 400px;
				height: 8%;
            }

            .department {
                height: 27%;
            }

	    .footer {
	        font-size: 10pt;
		display: flex;
	    }

	    #signature {
		flex: .5;
	    }

	    #signLine {
		display: block;
	    }

	    #date {
		flex: .5;
	    }

	    .ui-controls {
		margin: 20px;
		text-align: left;
	    }

	    button {
		font-family: sans-serif;
		font-size:14px;
		background-color: white;
		border:1px solid lightgray;
                padding: 10px 15px;
	    }

	    button:hover {
		background-color: lightblue;
	    }

	    @media print {
		.no-print {
		    display: none;
		}
	    }
    </style>
    <body>
        <div class='container'>
            <div class='logo'>
                <img src='" & logo_binary_data & "' />
            </div>

            <div class='marquee'>
                Certificate of Completion
            </div>

            <div class='assignment'>
                This certificate is presented to
            </div>

            <div class='person'>
                " & ThisItem.Full_Name & "
            </div>

            <div class='department'>
                " & ThisItem.Department & " Department
            </div>

            <div class='footer'>
                <span id='signature'>
                    <span id='signLine'>____________________________</span>
                    signature
                </span>
                <span id='date'>" & Text(Today(), "mm/dd/yyyy") & "</span>
            </div>
        </div>
        <div class='ui-controls no-print'>
            <button onclick='javascript:print()'>PRINT</button>
        </div>
    </body>
</html>"
    }
);
Finally, (still in the button OnSelect property) we run the flow and capture it’s response in a variable called create_certificate_response.
Then, we set the showFlowResponse variable to true to display the response message returned from the flow (succeeded or failed).
*We had already set the value of showFlowResponse in the previous UpdateContext statement so we need to use another UpdateContext statement here because you cannot specify the same field more than once within the same record.
UpdateContext(
    {
        create_certificate_response: CreateCertificate.Run(
            ThisItem.Full_Name,
            ThisItem.Department,
            html_string
        ).responsetext,
        showFlowResponse: true
    }
)
If the flow runs successfully, the certificate file (.aspx) will appear in the specified OneDrive location.
When opened, the .aspx file should display in the browser like this…
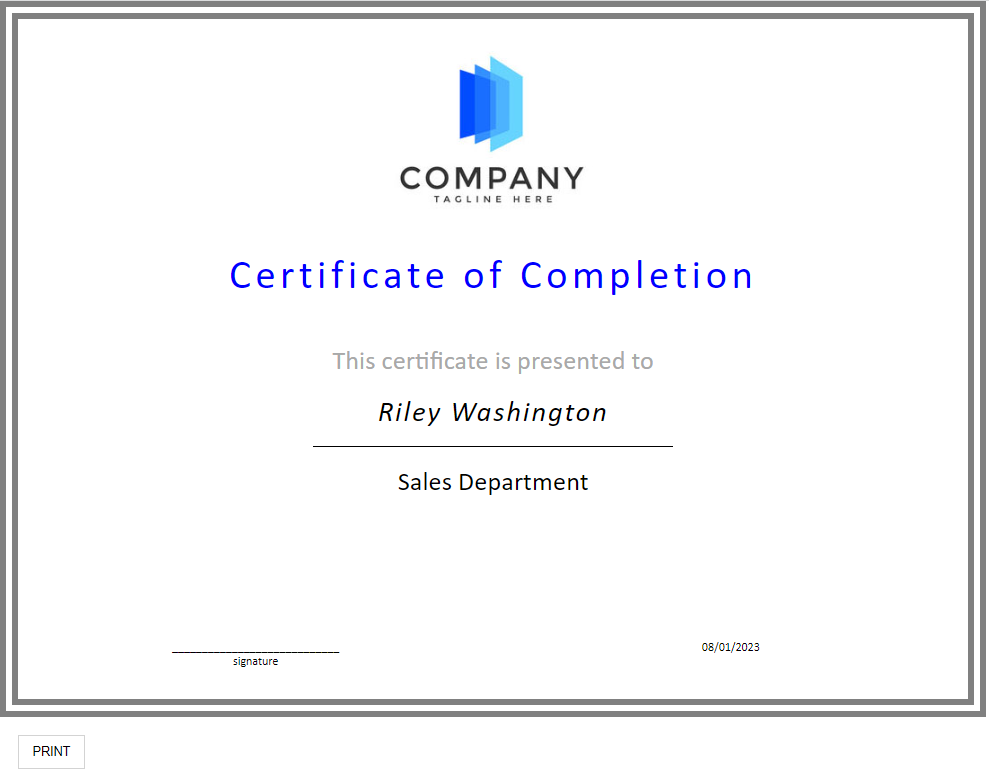
*I added an optional print button for convenience that calls the window.print() method when clicked.
Conclusion:
We now have a button in the canvas app that will populate a certificate template with the employee’s information and send it all to a flow which will save the certificate to OneDrive as an ASPX file that can be directly rendered in the browser to view/print.
For reference:
Here is the flow in it’s entirety…